How to Create Jira Dashboard

Think about your car’s dashboard. At a quick glance, you are shown a summary of all the important information you need to drive your car.
Your dashboard in Jira does a very similar thing for your projects. It gives you a high-level overview of all the important information you want to keep track of.
Understanding and utilizing the power of a Jira dashboard is an easy way for you to make the most of the platform and easily stay on top of everything.
Table of contents
- What Is A Dashboard In Jira?
- How To Create A Jira Dashboar
- How To Customize The Dashboard Layout And Add Gadget
- How To Share Your Jira Dashboard
- Conclusion
What Is A Dashboard In Jira?
Your Jira dashboard is the default display that you should see when you log in to Jira. The purpose of a dashboard is to give you an overview of ongoing projects so that you have a streamlined view of everything that is going on.
This makes it much easier to stay up to date and on top of everything and prevents you from wasting time doing repetitive tasks simply to gauge a high-level overview of projects.
You can have individual dashboards for different projects, or you can combine everything into one dashboard that gives an overview of every project you are involved in.
A dashboard is made up of windows called gadgets. These can show you anything from project statistics and graphs to JQL queries and personal Jira filters.
You should have a default dashboard that will be set up by your Jira administrator. However, you can also create your own and customize it to best suit your needs. Creating your own dashboards makes it much easier to make the most of the dashboard feature.
How To Create A Jira Dashboard
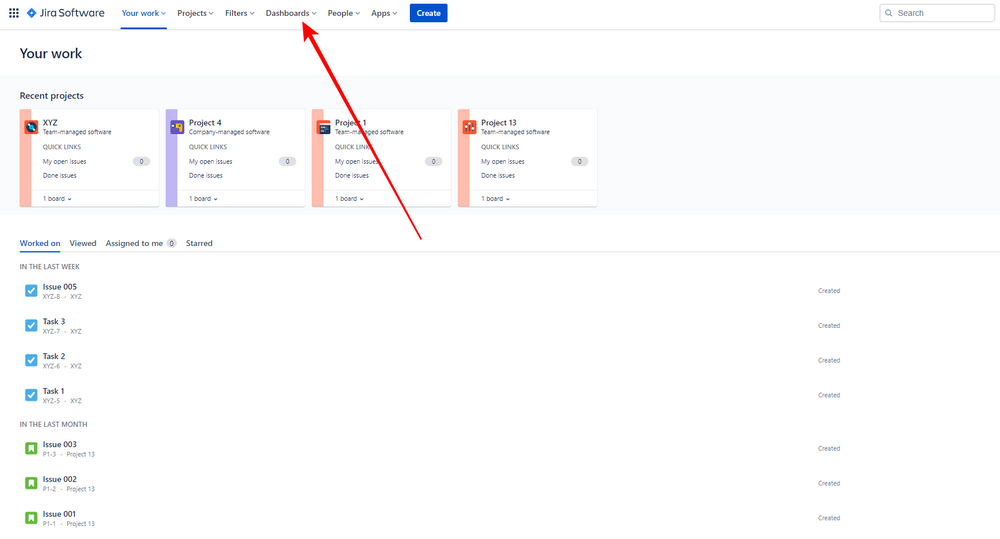
Step 1: Once you have opened Jira, you should see a horizontal menu across the top of your screen. One of the options contained in this menu is Dashboards. Click on Dashboards, and this should open a drop-down menu.
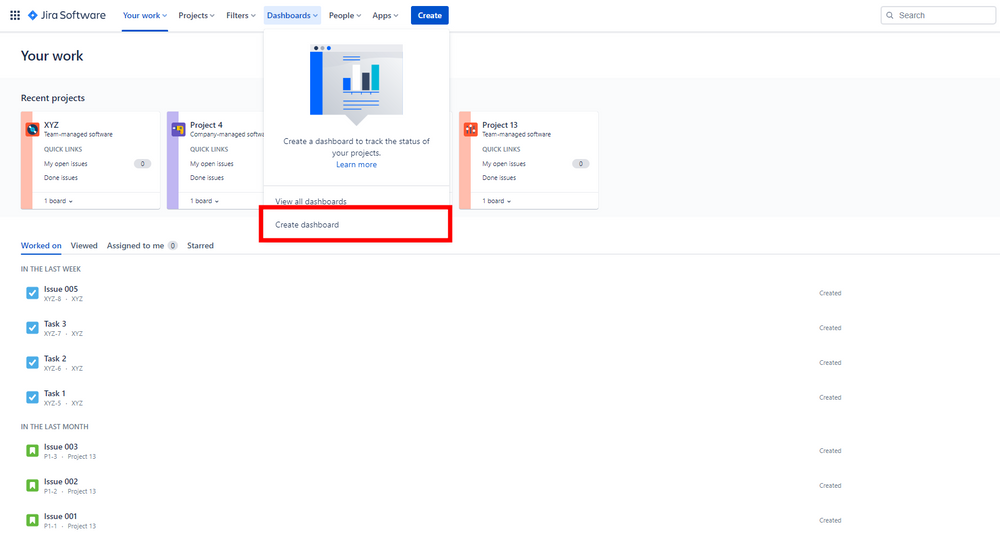
Step 2: At the bottom of the menu, click on the option to Create Dashboard. This will open the Create Dashboard Window.
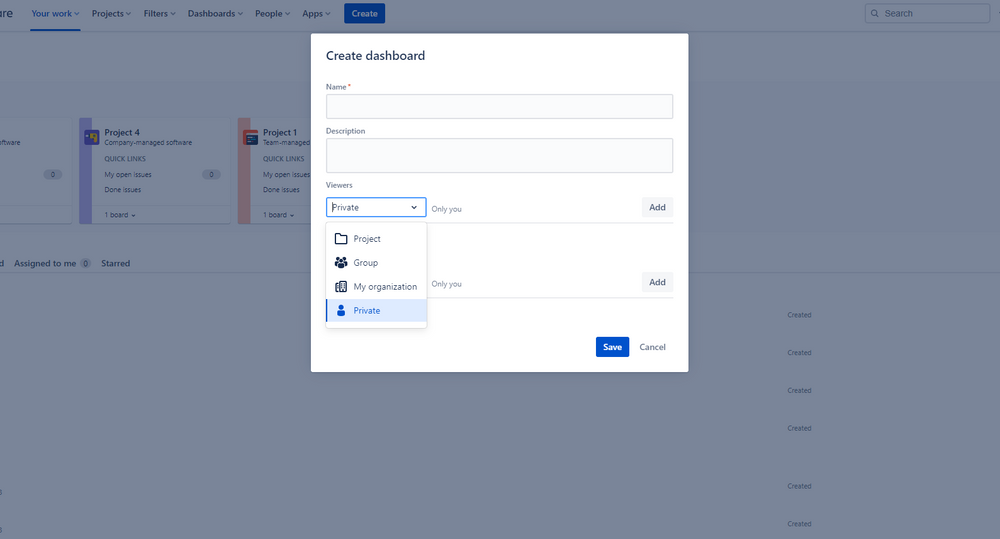
Step 3: The window will contain a field to fill in the Name of your project and a field for you to fill in a Description of the project.

The Name field has a red asterisk, which means that it is a required field. You have to fill in a name for the dashboard. The Description, however, is optional. Only fill this in if it would be useful for you.
Below the Name and Description fields, you will see a dropdown menu of different Access options. This determines which users will have access to your dashboard.
The menu will give you various access options for viewing and editing the dashboard.
For viewing, you can choose between four different options: Project, Group, My organization, and Private.
For editing, you can choose between: Project, Group, User, and Private.
If you click on Project, Group, or User, an additional drop-down button will appear where you can select which project, group, or user you want to give access to.
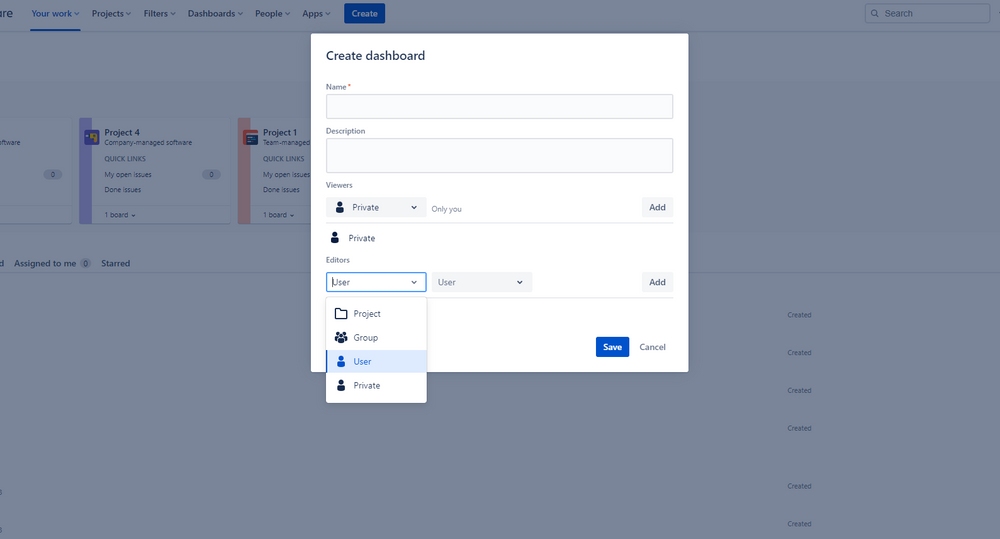
Once you have selected your desired Access option, remember to click on the Add button to the right of the access menu.
Step 4: Once you have added access and filled everything in, all you need to do is click Save. The save button should be in the bottom right corner of your Create Dashboard window.
Once you have clicked Save you have created a new dashboard!
How To Customize The Dashboard Layout And Add Gadgets
Now that you have created your Dashboard, it is time to start building your dashboard by adding gadgets and customizing your layout.
A Dashboard is essentially a collection of Gadgets, so choosing the right Gadgets is essential.
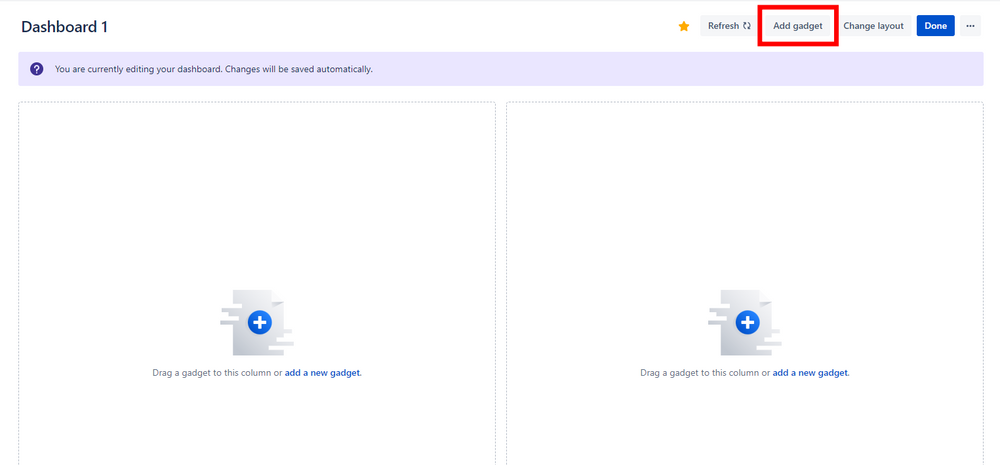
To add Gadgets, you need to click on the Add gadget button. When you’re in your dashboard, you will find this in the top right-hand corner of your screen.
Clicking on Add gadget will open a menu on the right-hand side of the screen. When you create a dashboard, this sidebar will automatically be open as you go into the dashboard.
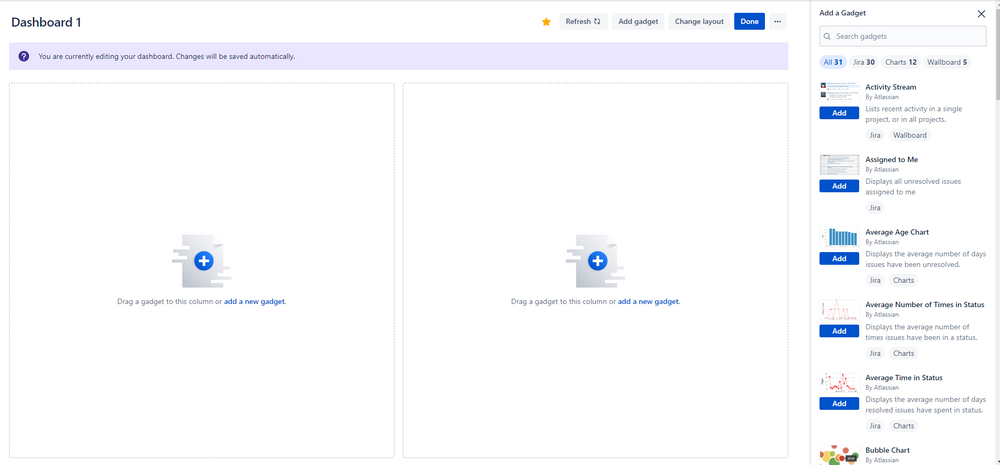
This menu will contain a list of gadgets. Many gadgets are automatically available to all Jira users. However, there are lots of other gadgets you can download from the Atlassian Marketplace.
You can find a gadget by scrolling through the list of your available gadgets. Alternatively, you can use the search bar or narrow down your search using categories.
For each gadget you want to add, simply click the Add gadget button.
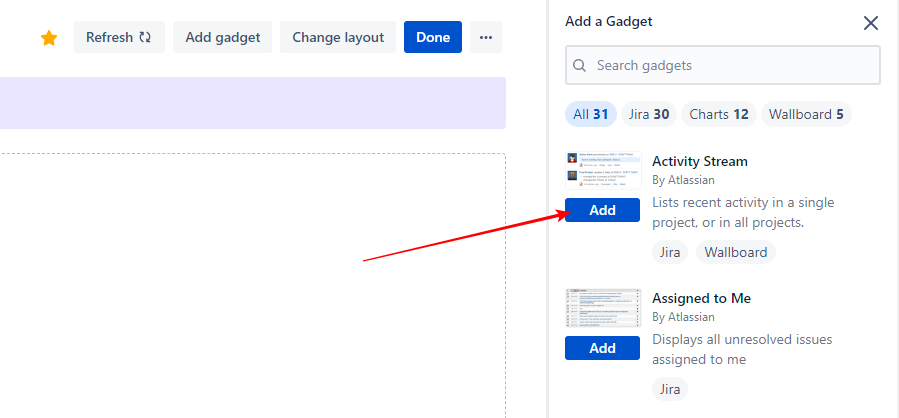
Once you have selected all the gadgets you want to add, simply click the close button (X) at the top right corner of the window.
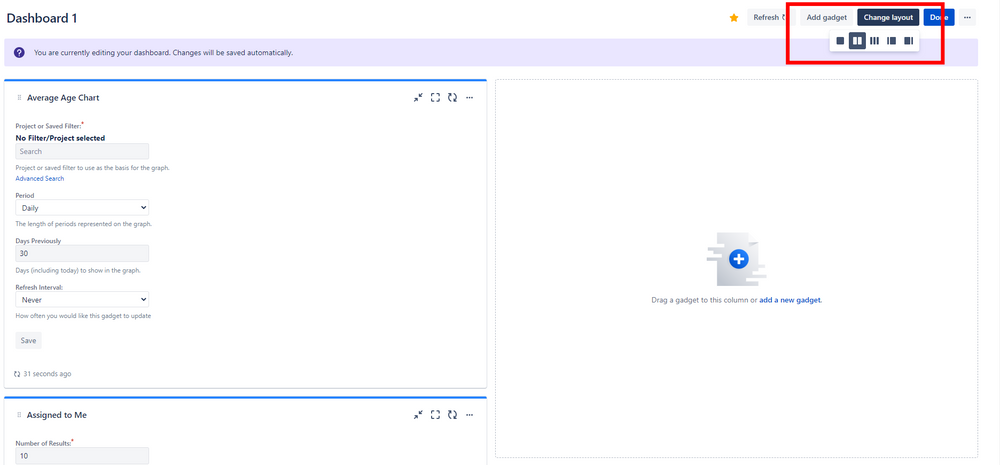
Once you have chosen your desired gadgets, it’s time to customize your layout should you want to change anything. You can change around where the gadgets are displayed simply by clicking on the gadget you want to move and dragging it to its desired location.
You can also change how the gadgets are displayed by clicking on the Edit layout button in the top right corner of your screen. This will provide you with different options for displaying your gadgets. Simply click on the option you want.
How To Share Your Jira Dashboard
When you make your dashboard, you will select who has access to the dashboard. However, you might want to share this dashboard with others users later down the line.
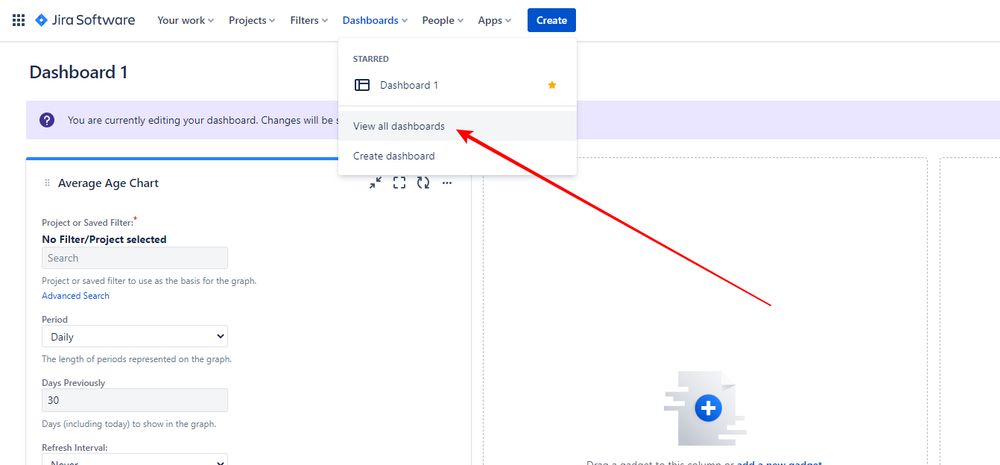
All you have to do is click on the Dashboards option in the menu at the top of your screen and navigate down to View all dashboards.
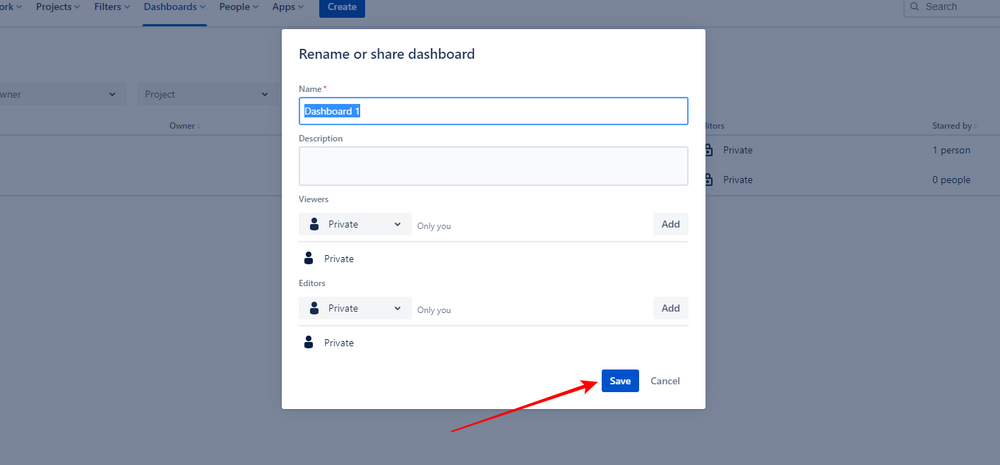
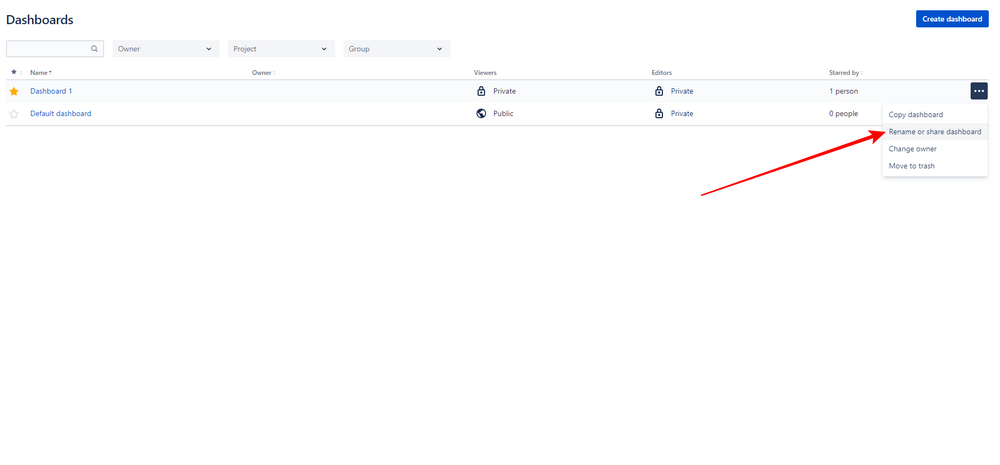
Navigate to the dashboard you want to share, and click on the More button, represented by three horizontal dots. This will give the option to Rename or share dashboard, which will open up the dashboard settings.
Then, all you have to do is choose who you want to share your dashboard with and select Save.

Conclusion
Creating and customizing a Jira dashboard is easy. It is also very useful and will make it so much easier for you to keep track of all your ongoing projects and keep your finger on the pulse.
Follow these simple steps and you should be able to create, customize, and share your Jira dashboards in a matter of minutes.
Are you looking to get started as a product owner? Or are you simply looking to expand your knowledge? EasyRetro has all you need to get you where you want to be, so be sure to check out our expansive range of resources, including our blog, retrospective templates, and Retrospective Academy!
Improve your team with fun sprint retrospectives
Create unlimited boards for free and make retrospectives fun again